
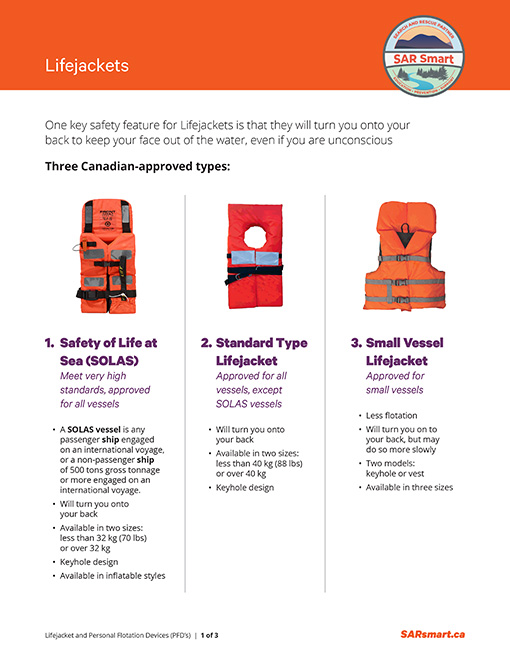
Lifejackets
Why is it important to wear a Lifejacket/Personal Flotation Device (PFD) any time you are out on a boat or on the shore fishing or hunting? Because if you unexpectedly or unintentionally end up in the water, a lifejacket/PFD will keep you and your head above the water.
Lifejackets/PFDs are the key to surviving an accidental fall into the water, especially if that water is cold. Statistics have shown that 82% of those who drowned in boating incidents were not wearing a lifejacket or PFD or not wearing it properly. Had these individuals been wearing this lifesaving device, it is likely they may have survived.
Statistics have shown that 82% of those who drowned in boating incidents were not wearing a lifejacket or PFD or not wearing it properly.
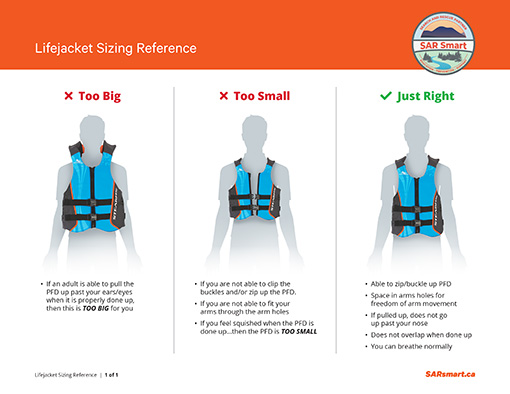
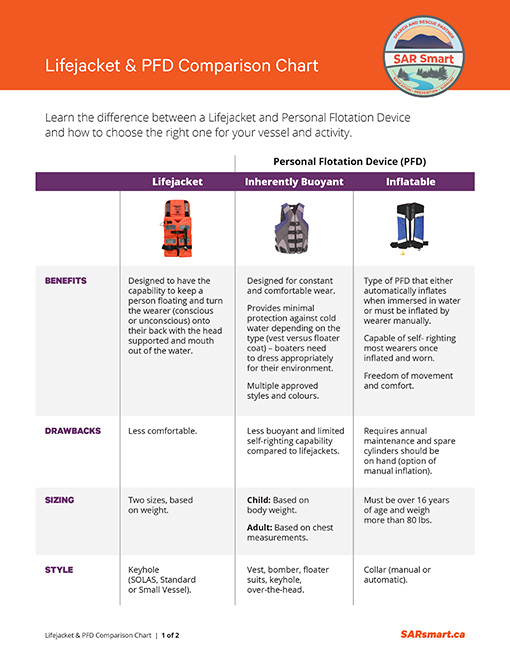
Do you know the difference between a PFD and Lifejacket? There is a difference between lifejackets and PFDs and how they will fit you. It is important to weigh the characteristics of each to decide which is better suited to your specific on-the-water activity and needs.
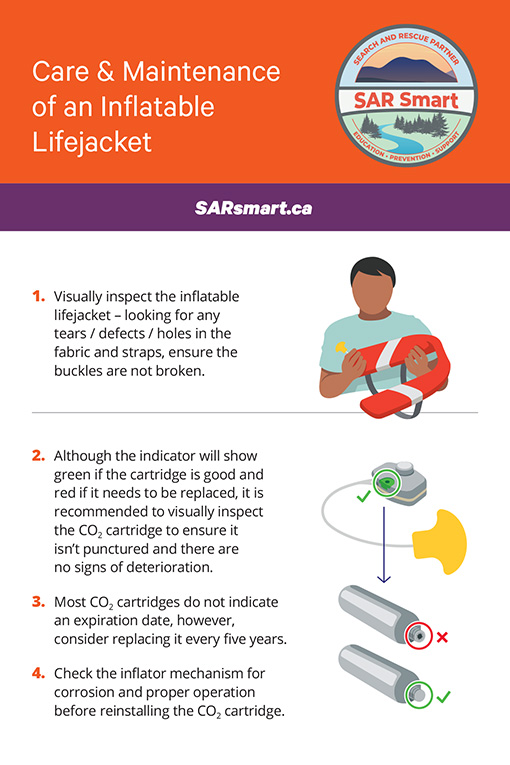
Check out our downloadable reference material and educational videos below to learn more about lifejackets, including how to properly fit one, the differences between a lifejacket and a PFD, how to care for your lifejacket and much more.
Downloads
The Cold (Water) Facts
What is hypothermia?
When exposed to cold temperatures, your body begins to lose heat faster than heat is produced. Lengthy exposures will eventually use up your body’s stored energy, which leads to a dangerously low body temperature. Normal body temperature is around 37 degrees C (98.6 degrees F) and hypothermia occurs as your body temperature falls below 35 degrees C (95 degrees F).
Hypothermia is caused by prolonged exposures to very cold temperatures.
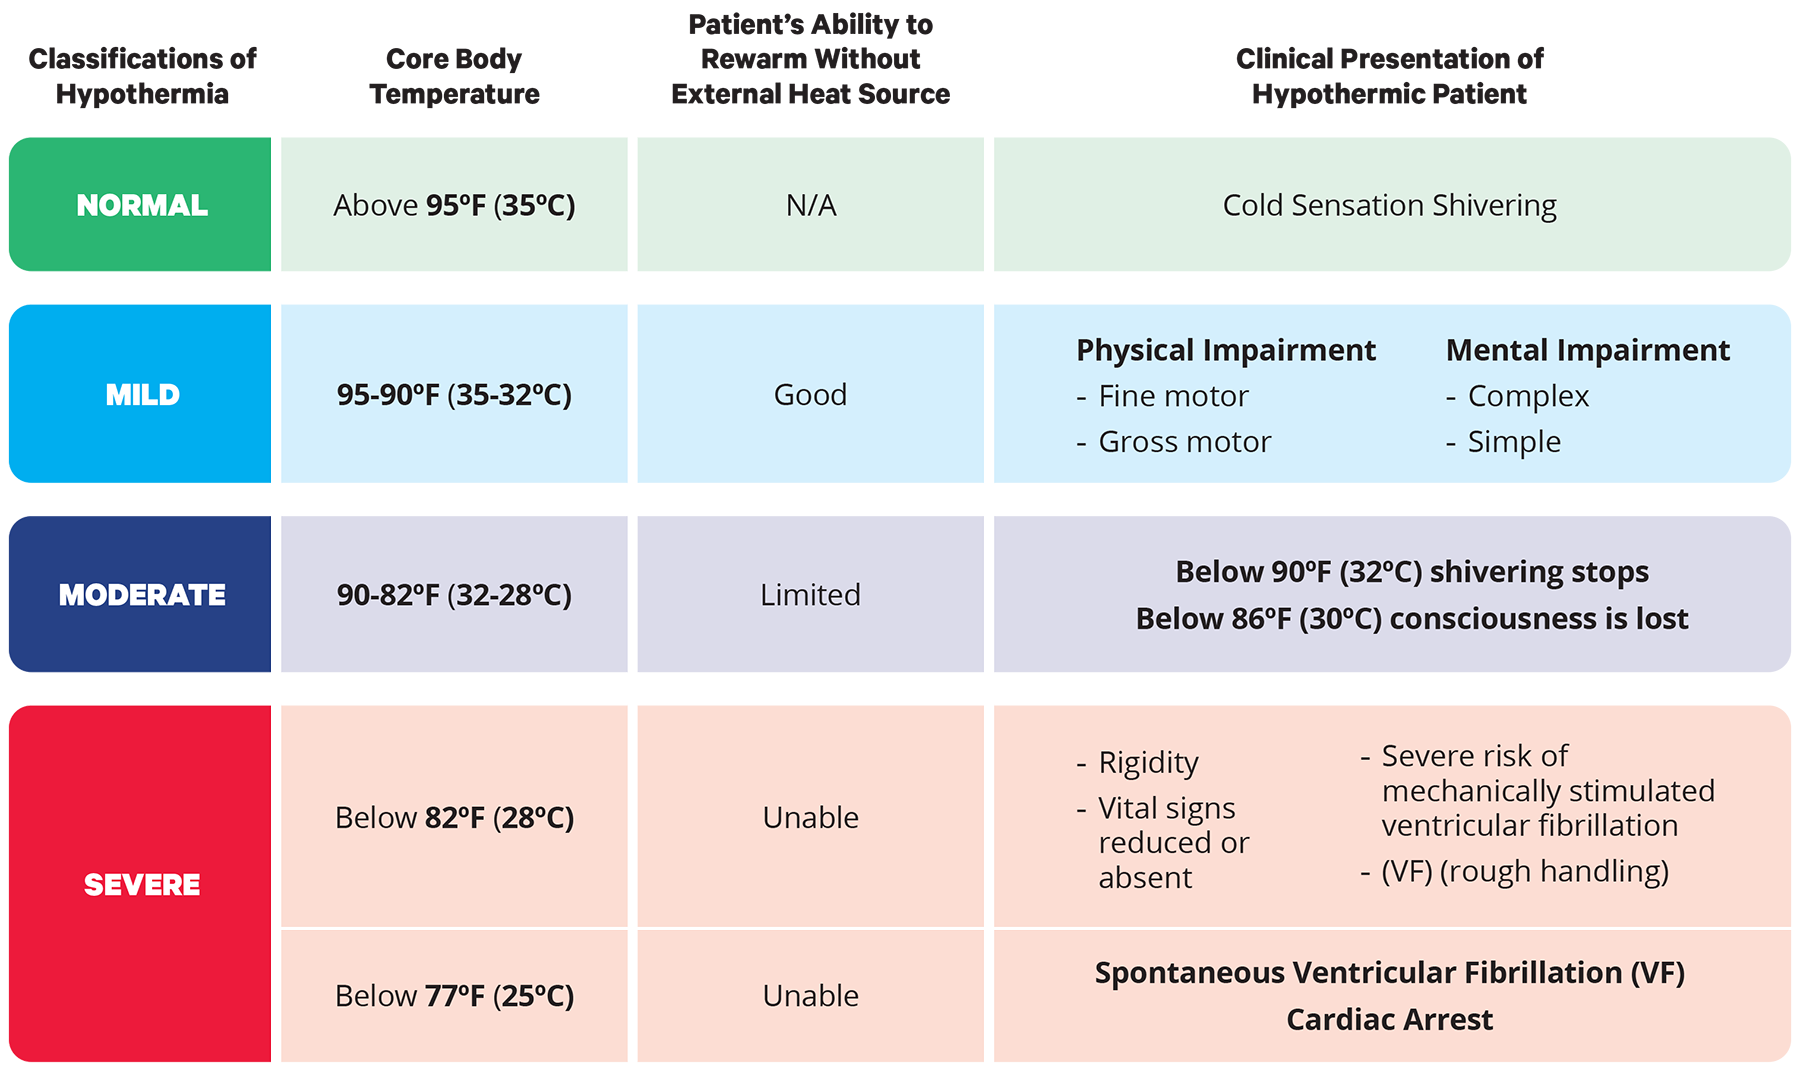
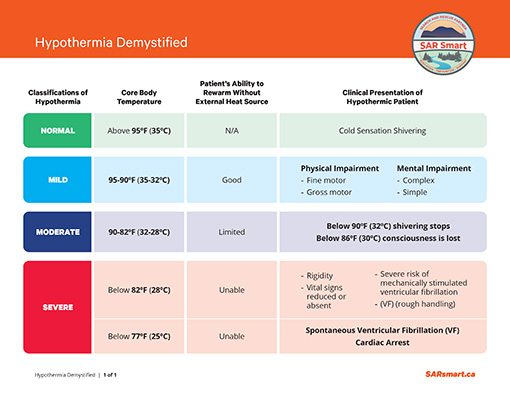
There are three stages of hypothermia; mild, moderate and severe. As your body progresses through these stages, you will experience shivering, rapid breathing, fatigue, impaired judgement, lack of coordination and an increased heart rate as your body’s blood pressure rises and your blood vessels constrict.
If you fall in ice water (less than 5 degrees Celsius), with winter clothes on, how long do you think it will take to become hypothermic?
You will not die from Hypothermia in 5, 10, 15…not even 30 minutes. In fact, mild hypothermia only begins to set in around 30 minutes of being in ice cold water.
The following chart lists the signs and symptoms used in the classification of the three stages of hypothermia; Mild, Moderate and Severe
First 3 Phases of Cold Water Immersion and the 1-10-1 Principal
What are the first 3 phases of cold water immersion that you would experience when you accidentally end up in cold water.
1. Skin Gets Cold
- Known as Cold Shock Response
- Lasts 1-2 Minutes
- Your body would react with a gasp, hyperventilation, cardiac work
2. Muscles and Nerves Get Cold
- Known as Cold Incapacitation
- Lasts 2 – 20 Minutes
- Your body would react with increasing weakness and incoordination
3. The Core Gets Cold
- Hypothermia
- >30 minutes and progresses from mild to severe
- Core body temperature drops from 37 degrees C to 35 degrees C
A simple way to remember the first three phases of cold water immersion and the approximate time each phase takes. Learn the 1-10-1 Principle.
Stay or Swim
It is important to understand the risks of swimming in cold water and that, even in the best of conditions, swimming to shore can still be dangerous.
Imagine your boat has capsized in the middle of the lake, the water is cold and there is little chance of rescue, which in remote areas is normally the case. You ask yourself, “Should I stay with the boat no matter what or make a swim for shore? Can I make it if I do decide to swim?”
1. If you swim, thinking you can get to shore and you’re wrong and don’t make it to shore…
Without a lifejacket - The price is drowning when you can no longer swim anymore due to incapacitation and ultimately death.
With a lifejacket - The price is you will not be able to use your arms and legs due to incapacitation, but at least you’re still floating.
2. If you do not have a lifejacket on, do not swim! Stay with your boat.
3. If you do have a lifejacket on, get your breathing under control, ask “is rescue likely” within an hour or so.
If yes – Stay with your boat, preserve energy and heat.
If no – You may consider swimming, determine the closest / easiest destination that you can reach within 45 minutes. There is still no guarantee you will make it to shore and at least you have your lifejacket on!
4. Once you make your decision, stick to it!
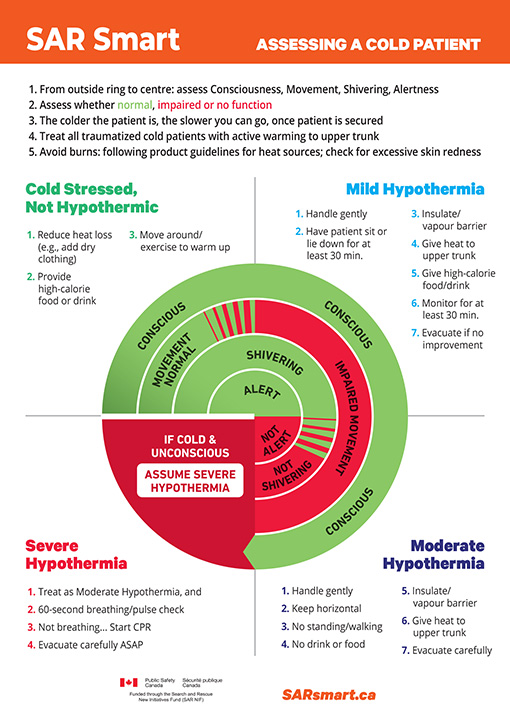
Care for a Cold Person
When you are caring for a cold person that just got out of the water, ensure that you handle them gently, aiming to stop the fall in core temperature and establish steady, safe warming.
As soon as possible, remove or protect the cold person from the cold environment and create a dry, vapour barrier.
Give the cold person warm (not hot) chocolate to sip slowly.
Ensure you are prepared with the proper tools to care for a cold patient when you go out on your boat and on the land. Suggested supplies to have with you in cold environments:
Tarp or plastic sheet for vapour barrier used inside the sleeping bag (a second one can be used as a vapour barrier outside the sleeping bag)
Hooded sleeping bag or blanket (or something similar)
Extra warm clothing
Self-Rescue & Reboarding
Being able to self-rescue and get back into your boat in case of an accidental immersion is key for survival. If your boat does not come with a ladder, there are several portable reboarding device options available to you. You can purchase a ladder to be kept in your boat, but you need to ensure the style of ladder fits your boat and that it is easily accessible in case of an emergency. An easier and simpler option is to make your own rope ladder. Once made, secure the rope to the stern of your boat, and ensure that is within your reach if you are in the water.
Self-Rescue with a Re-boarding Device
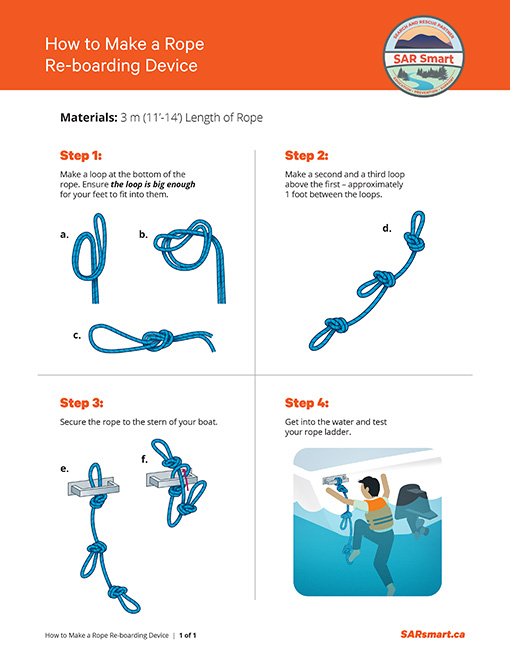
If you accidentally fall out of your boat, the best thing is to have a way to get back in, especially if no one is in the boat to help you back in. Making a simple re-boarding device out of a 14-foot piece of rope that can be attached to your boat all season long so you have a way to get back into your boat. This is a very important part of self-rescue. Here is how you can prepare your re-boarding device ahead of time. To make a rope ladder re-boarding device you will need:
Between 11-14 feet (approximately 3-4 meters) of rope.
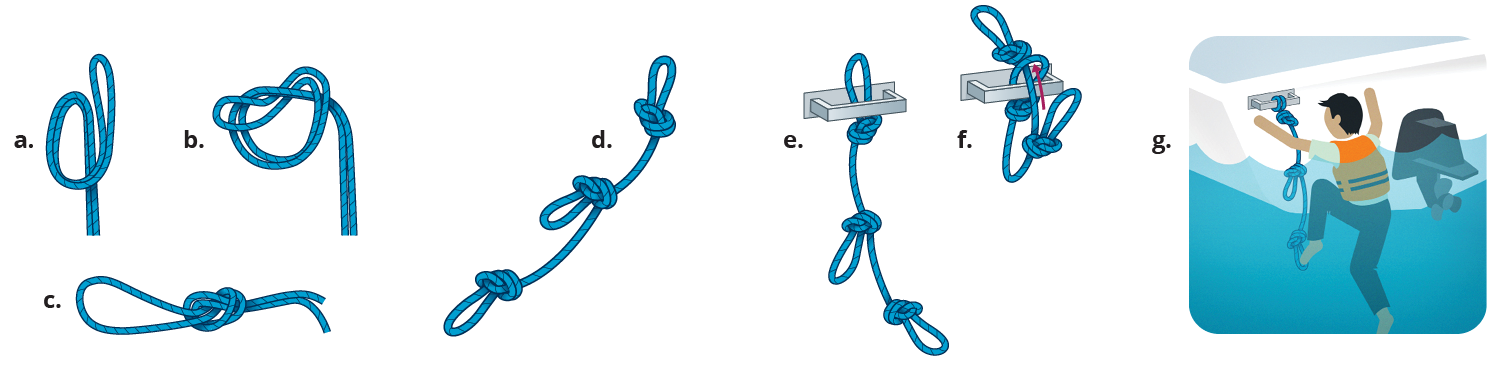
Fold the rope in half (a), make a loop with a simple overhand knot (b). The loop has to be big enough to easily put your foot in (c).
At each end of the rope, double a short length of rope over and make a similar knot to create a similar sized loop at each end.
You will now have three identical sized loops, one at each end and one in the middle (d).
Attach the loop at one end onto a secure part of your boat like a grab handle or a transom support (e). You can attach it by putting the loop through the support and thread the rest of the rope through it (f).
The other two loops are foot holes, which you have already made and you are sure they are big enough to fit your boot in.
Ensure that, if you were to fall overboard, you could reach up and grab the rope and pull it into the water so you can re-board (g).
Once the rope ladder is attached to the boat, you can keep it inside the boat and ready to be used all season.
To attach your re-boarding device to the back-grab handle of your boat, see the graphic above:
Notice how you can take one of the loops at either end and thread it up and through the grab handle and then pull the rest of the rope through that one loop. No extra knots required.
Downloads
Weather
Weather can be unpredictable. Storms can be more severe than the forecasters predict and can pop up sometimes unexpectedly. Always check the weather before you are heading out on your trip and continue to keep an eye on the sky and water or ice conditions while you are out. Ensure you dress in layers and if you are going on a longer trip, pack extra clothing.
Leaving a Trip Plan
Trip planning is important before you head out on the boat. In addition to including extra food, a first aid kit, extra gas, extra clothes and water, it is just as important to let a responsible person on shore know where you are going, who you are going with, how long you will be gone, if possible, details of your route and what they should do if you do not come back on time.
If something does happen to you while you are out on the boat and do not return when you said you would, the responsible person you left the information with can organize a search and people can be sent out to look for you. This is where a trip plan comes in handy.
A trip plan, also known as a Float Plan includes information about your boat type and colour, number of people aboard, expected route and the date and time of return. For shorter trips, a Float Itinerary which includes details about where you are going and when you’ll be back. This plan is left with a responsible person in the event that you do not return when you indicated you would, they should alert the authorities as soon as they can after confirming that you have not returned. Authorities include the local police, local search and rescue group, local firefighters or all of the above. The responsible person should communicate all the information that you gave them before leaving to the authorities so they are better equipped to search for you. The authorities will know what to do and will handle the situation from there.
SARSmart Video Collection
SARSmart’s video collection showcases essential tips and techniques for staying safe while out on your boat. These videos cover everything from cold-water swims to building a simple rope ladder that you can keep attached to your boat all summer long in case you need it for reboarding.
No matter your activity or reason for being on the water, keep these videos in mind to help ensure your safety.
• Help/Huddle Position
• How to Make a Rope Ladder
• Reboarding with a Rope Ladder

